Hello guys!
The job of assembling the machine into the field appears to be easy, however many individuals nonetheless don’t listen, so the meeting additionally takes a number of time. As for the meeting of the brand new machine, it’s easy and infrequently causes errors, however assembling the previous machine in, or eradicating the machine for cleansing typically causes a number of illnesses. Ailments associated to the disassembly of the machine similar to: disassemble the machine to wash it, the machine doesn’t obtain the usb, the speaker is within the entrance port, there isn’t any energy or hdd indicator gentle. So it is advisable pay particular consideration when assembling the machine into the field.
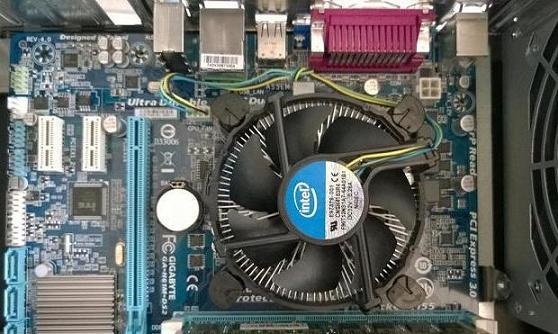
_First it is advisable connect the ram, cpu, fan to the mainboard first, not the mainboard first, this is essential as a result of the illness associated to cleansing the machine is generally as a consequence of attaching the cpu to the again. Connect the mainboard, take note of connect the cpu fan appropriately. As a result of in case you set up it incorrectly, it’ll make the machine not up as a result of the cpu is channeled, the contact is just not sufficient pins, making the machine run for some time after which flip off as a consequence of warmth. As proven within the image above is the mainboard Gigabyte GA-H61M-DS2 this primary makes use of socket 1155 patched. The connected fan is much like the socket 775 I discussed: take away and assemble the cpu fan
_After absolutely attaching the ram, cpu and fan, you proceed to screw the liner into the case (for brand new packing containers, individuals haven’t connected, or not correctly connected to their primary). To screw the liner, you place the primary in and see the place on the primary there’s a mounting gap for the liner, I connect it, the nut needs to be tightened with pliers in order that once I screw the screw to repair the primary with the case it does not run. Notice that you should connect sufficient screws to the holes on the primary, connect it if you press the ability twine, or connect the ram to make the mainboard bent.
_ After attaching the liner, proceed to connect the ability to the field, connect the aluminum fe piece to cowl the rear ports of the mainboard and put the primary in to tighten the screws, tighten the screws, do not tighten an excessive amount of, expertise needs to be tight sufficient, however previous primary when tighten will make the mainboard contact the mass and never up.
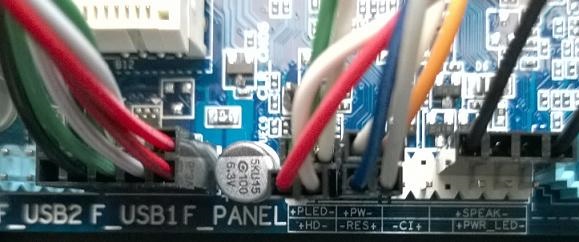
_ Connect the usb panel wires, audio, exterior audio system, energy cords, reset. Mounting the panel of the USB ought to connect the USB1, audio port, there may be only one, attaching these 2 panels is easy as a result of individuals do it monolithically, so simply connect it in the fitting route. Panel of led, energy is a bit difficult. Normally on the primary, individuals have directions for me the place is pw, res, pled, hd led. Foremost is written proper on the panel (as proven above), primary is written close to ram slot, chipset. Connect the ability twine and reset it, you’ll be able to connect it in any route, it does not matter the – and + poles. Simply put it in the fitting place. As for the ability gentle panel and the laborious drive gentle, you should connect the proper polarity – and +, then it’ll run. Normally the + pole is the crimson and inexperienced pin and the – pole is white.
_Next is to connect the 24-pin energy twine to the primary (20 pin additionally works usually), 4-pin wire for vcore cpu energy, connect energy twine for DVD drive, sata cable for DVD, laborious drive. Notice that on the motherboard with SATA ports numbered from o to 4, it’s best to prioritize port quantity 0 for laborious drives and port numbers 1, 2, and three for DVD drives. The primary port continues to be essentially the most optimum.
After attaching all the ability cords, the cables are absolutely related. The drill brother has connected the ability twine to the laborious drive, should take a look at the machine to see if it is up or not, then the machine will activate after which connect the ability twine to the laborious drive after which connect the case cowl. Doing so to keep away from the case of turning on and off killing the laborious drive -> knowledge loss. That is it, good luck.


