New made the Gigabyte GA – G31M – S2L mainboard, the standing is that the ability is plugged in and the ability isn’t activated. The tremendous I/O chip for brief is the recent I/O chip and the principle cannot activate the supply both. Share for these of you who have no idea easy methods to take away and substitute the IO chip for the mainboard.
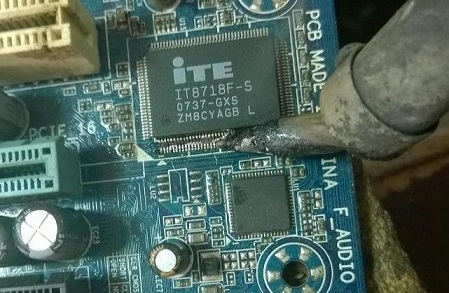
A quick introduction to the SIO chip: English is tremendous enter/output (managing enter gadgets) This chip manages the FDD port (floppy drive), manages the keyboard, mouse, and LPT port. And it additionally combines with the male chip to activate the ability, making a system reset sign. When your mainboard doesn’t acknowledge the important thing, mouse, can not click on the supply, test this chip first. IO chips are normally produced by producers: ITE, winbond, SMsC… This chip has 4 rows of pins which are normally about 4cm in measurement and is the most important chip on the principle board together with the LAN IC as effectively, however subsequent to the LAN chip. all the time have 25k quartz.
When figuring out that the I/O chip is defective, you proceed to take away the chip from the mainboard, if the chip has been changed as soon as, you simply want to make use of a torch to take away it, and for the zin chip that has by no means been eliminated, it is advisable to use it. soldering iron claws the pins to take away lead zin (as a result of lead zin may be very exhausting, taking a very long time to kill the chip).
You set solder grease on it after which use a soldering iron to softly stroke the 4 rows of the chip’s legs. After swiping, take the torch and torch all 4 rows of legs to take away the chip. The torch must be set to the utmost wind degree, the temperature is 300 ° C. If the torch doesn’t show the temperature, set it to five.
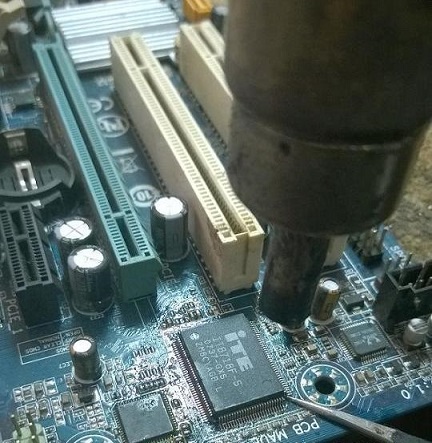
You take note of the surface of the legs, circuitously on the chip’s again to make the chip die. When torch, transfer your arms round 4 angles together with the beat and carry it up barely if you see the leg open, then take away it, carry it frivolously or you’ll not minimize all of it off. It’s also possible to take away the torch head, however I’ve gotten used to it, so I am going to go away it at that.
After the IO chip is faraway from the mainboard, use a soldering iron to swipe the pins on the mainboard to degree it to place the brand new chip in later, so swipe the pins equally, then use your palms to the touch the pins on the rows to really feel if any pins are damaged. rise no. Then clear the board with acetone.
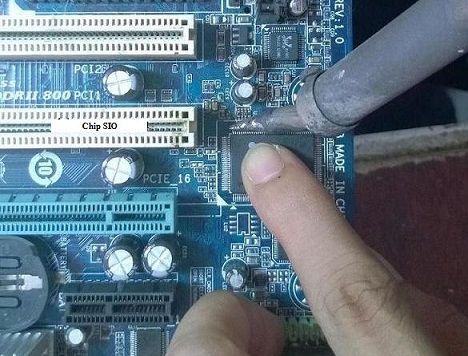
Chip IO after eradicating from the principle and cleaningThe IO chip to exchange may be purchased new or faraway from the principle physique, however be certain the chip continues to be alive to keep away from dropping time. Might be taken from the principle broken socket, useless chip north … Exchange the IO chip, it’s obligatory to exchange the proper sort. And also you simply want to exchange it with the identical 2 strains of textual content within the above row. I’m changing the IO with the code IT8718F – S 0737 – GXS, I can substitute the equal one IT8718F – S 0748 – GXS . As well as, a variety of predominant gigabytes can be interchanged like GXS = HXS
If you happen to change from the principle physique, it’s best to brush the IO chip pins to wash, to not let the pins stick collectively, if the legs are bent or warped, they have to be adjusted, as a result of when eradicating and lifting, the legs are bent. I normally clear the IO chip pins, then put the chip on the glass, iron (typically flat) then use my finger to press firmly on the chip’s again. The purpose is that if any of the legs are bent, they’ll straighten them.
Extra about this supply textSource textual content required for extra translation data
Ship suggestions
Facet panels
Now proceed to connect the chip to the mainboard solely, connect the chip, solely use a soldering iron. You set the chip on the mainboard, take note of the proper path of the foot. Then look intently on the 4 corners to see if the legs are matched. After fixing, use a soldering iron to repair the 4 corners of the chip to forestall the legs from being deflected. Then put your finger on the chip’s again, put solder grease, lead in and use the soldering iron to stroke this facet after which swap to the opposite facet. The aim of placing your finger up is that if you really feel your hand is scorching, do not do it anymore, anticipate it to chill down once more (as a result of this chip has poor warmth resistance).
The step of attaching the chip to the principle is probably the most tough as a result of if you don’t get used to it, it is going to solely persist with the pins. When doing it, you set a whole lot of lead and solder on it in order that it sticks to the board. Have a look at the image above. I swipe from high to backside, and the underside of the legs will stick collectively and have a whole lot of lead. To get all of the lead out, you simply pull down and pull the solder tip out of the sound chip to steer it out step by step, or pull it down after which use the lead drawstring to get the lead out. Do the identical for the remaining corners. Necessary word: When pulling, it’s best to take note of pull some resistors, small capacitors are situated close by, in case you are cautious, take an image, when you lose it, you’ll know the place to place it again.
As soon as accomplished, see if any of the legs are touching, clear it and test it. Much like changing the clock ic, the supply ic additionally does the identical. Want success.


Rất hay và bô ích,mong ad ra nhiều tài liệu hay như vậy,
Cảm ơn bạn, nhớ ghé blog thường xuyên nhé
Thay như vậy rồi có nạp firmwaer cho nó không ad